Wednesday, January 30, 2013

"The" Raglan Sweater Update 2

I sat down after dinner tonight to finish the sweater.  You name it it happened, this time I blame myself, I was all thumbs.  As a matter of fact I sliced the edge of my thumb too!

The good news is below, done with the knitting now to seam it all up and block it.  There has to be at the least 30 yarn ends hanging off of this.  The color is a deeper burgundy, the camera flash did it no justice.

Driving to work this morning, I envisioned a better way to knit this, it's going to be so easy!  Is thinking about knitting as you drive just as dangerous as texting and driving???

Top Down Raglan Completed

Tuesday, January 29, 2013

Raglan Sweater Update

So you don't think I'm a quitter on this sweater, here it is right off the bulky machine front and back done.  The mitered neckband needs sewing...later for that.  On to the sleeves.

Progress...


Raglan Sweater To Die For!

Yes, because you will want to slit your throat if you do this one!

I design my own patterns in simple language.  But, wanted try another designers pattern as you never know what better technique they may have.

So, I started this top down v-neck raglan and it has been all nightmares!  I have been knitting, machine knitting and sewing for years and years.  This is probably the most frustrating sweater ever.

After reading and re-reading the written instructions and trying to sort out the schematics (too many arrows, numbers drawings on top of each other).  I got their gauge (usually I just adjust the pattern but something told me not to), and was able to sit down and get going.

The troubles started with the neckband.  An odd way to do it but thought try their way it may be easier and better.  No.  After knitting front triangles that you scrap off on WY, you then have to rehang them and e-wrap the back neckband stitches between the triangles.  Then, with a marker row knit one row, easy enough.  So, the technique to make the folded neck band has you doing FF decreases, then a turn row followed by a tighter tension and the FF increases which get too tight.  Yikes, Not done yet!  So once that mess was done, time to rehang the stitches from the marker row ONLY from the two triangles.  The back stitches now get scrapped off on WY, the extra 4 stitches for each sleeve get scrapped off.  The triangle stitches are now doubled and need to be sewn off (backstitched) on the machine...not me I did a behind the gate pegs bind off.  Again cut the yarn, turn the neckband and rehang the e-wrapped neck band stitches. OMG!  trying to rehang e-wrapped doubled stitches on top of single stitches in WY & backwards....get the idea?

So got through all of this and now there are so many yarn ends it looks like I'm making spaghetti.  I begin to knit the back from the "18" neckband stitches the pattern indicates but when you do the math you end up with 20!  I figure so what, it's a half inch just knit.  Then, a manufactures knot that slipped by my eye/hand when I wound the yarn, thank fully it ended up on the purl side so no harm done (photo below).  I take the back off of the machine pull out the WY (light blue in my photo) and lo and behold, most of the loops from the e-wrap are showing!

Lesson learned?  Yes, design my/your own or find a designer who knows how to knit on a machine.  I have test knitted many items without seeing a schematic or photo, no problem. I recently test knitted for Diana Sullivan; her Footnotes no-sew slipper (love these) and her Wear Your Diamonds (entrelac) sweater.  Piece of cake and was able to offer hints and fix some things with her.  Diana also published my photos in the Footnotes book.

Will I finish this?  Yes.  Then I will re-write the instructions correctly and post them here for all of you!  I don't drink but I may go have a sherry!

Hanging Neckband Mess, Spaghetti!

Manufactures Knot - Don't You Hate These?

Monday, January 28, 2013

Swatching To Get Tension/Gauge - My Way....

There are many different ways to get a good tension/gauge  swatch.  "My way" works for me and I just passed it on to a dear friend as I mentioned to her I was laundering my swatch to start a raglan v-neck sweater.

I always swatch in the pattern I am going to knit.  My method takes into account the ends of the knitted fabric (they knit a bit differently than the center of the swatch).  Most methods only measure the center stitches and rows which are framed by a contrasting color yarn; that makes it easy as you don't have to count stitches and rows.  My method is the same but no markings!  It has not failed me yet for a perfect fit.

MY METHOD
Bulky - Cast on for two full pattern repeats (if you are knitting a pattern of any kind) including different colors yarns, tuck and etc. or for stockinette/rib on 40 needles.  Closed edge cast on and knit the swatch for 60 rows; last row (61) at least 4 tension settings higher, loop through a loop cast off.  Set stitches and launder as you plan on doing the finished project.  Then once all dried and blocked, measure the entire swatch and divide the inches by the stitches and rows!  Done.

Standard - Same method except I cast on 60 stitches then knit 60 or 80 rows (depends on the yarn thickness).  Treat the same was as the bulky for measurements.

I like to record the yarn type, gauge and project on a tag which I tie on the swatches.  When making more than one swatch at a time I make overhand knots on the yarn end for the tension setting.  If I am using a T5.2, I make 2 knots at the end of the yarn tail (seven knots on the yarn tail with a large separation and the whole number knots are always closest to the knitted swatch).

Now, if this scares you a bit then try Diana Sullivan's technique (below is her YouTube video) which is perfect!


Wednesday, January 23, 2013

Promotional Knitking Video Compuknit V - 1993

Stumbled upon this tonight on YouTube.  I found myself watching the entire video.  The original commercials for the Knitking knitting machines are toward the end of the video.  Fun!

Tuesday, January 22, 2013

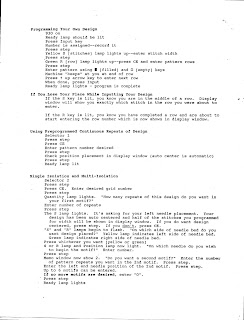
Brother 930 Programming - Simplified!

While I was cleaning out some of my knitting items and organizing, the below Brother 930 programming tips slipped out of a book.

Blogger will only allow you to upload photos.  So to get around that on my iMac, I scanned each page as a PDF then changed the extensions performing a "save as" - wish I knew who, when and etc. so I could offer credit where it is due for these.

Page 1
Page 2
Page 3

Page 4

Monday, January 21, 2013

Plaid Knitted Fabric Back

Another Blogger, Phil asked about floats on the back of the plaid knitting pattern in a previous post.

Here it is, almost tempting to use the back as the public side!

Private Side Of Plaid Fabric

The original post: Playing With Plaid

And the pattern: Plaid Pattern

Sunday, January 20, 2013

Another Hobby Of Mine - Non Knitting

I shared this with a friend tonight, thought I would share with you too.  Nothing to do with machine knitting, sorry.

This is tucked in the corner of my living room, fully functional and adds to my eclectic home.

Circa 1950's Western Electric Switchboard

Damaged Knitting Machine During Shipping

This video is of a Seller receiving an electronic machine back damaged.  The Buyer, who sent it back to the Seller did not pack it correctly.

Last month, I purchased another electronic machine from a great Seller who packed it correctly but during shipping process the end of the machine was damaged (worse than in this video), needle bed was bent and circuit board was damaged rendering it unusable.

When buying, all you can do is pick-up a machine yourself or make sure the Seller packs it very well and hope the shipping company does not damage it.  This has happened 2x to me when buying a machine.  ALWAYS have the Seller insure the machine for the purchase price including the shipping charges.


Knitking Technical Tip For Brother 930, 940 Compuknit lll or lV

A reason I love to blog, making new friends.  Several months ago I started emailing another machine knitter who had contacted me. We are emailing back and forth almost daily now, what a nice person she is.  We had exchanged phone numbers at one point and when she sensed I was down by my emails and having "one of those" weeks at work she called me to see if I was okay.  WOW!  That call changed my whole day and really made me smile.

We share lots of tid-bits, knitting and food are mostly the topics.  Knowing that my Brother 930E had been acting up "Katherine" sent me the below tech info for the Brother 930, 940  and or Knitking Compuknit lll/lV, it's all about adjusting the magnet sensor boards so your Garter Carriage will knit patterns correctly.

Thanks Katherine!
Brother 930/940 & Compuknit lll or lV

Monday, January 14, 2013

Plaid Pattern For Punchcard Or Electronic

Had a few emails already asking for the pattern.  The below can be entered into an electronic, drawn on a mylar sheet or punched.

It's 48 rows long and 24 stitches wide.  Electronic owners would not have to enter all 48 rows, just one pattern repeat (there are two on below) or 24 rows.

Please share and enjoy!

Plaid Fairisle Pattern

Sunday, January 13, 2013

Playing With Plaid

It's freezing here tonight, temperature dropping to 24°F (-4.5°C), NOT what we usually experience.  I still have lemons on my trees, really should have taken them all in.

Because of the cold I felt like knitting something warm and have been wanting to "play with plaid" for a while; tonight was the night.

Here are two swatches I came up with, I like the gray/blue one best.  If you would like the pattern, let me know!

Gray/Blue

Blue/Blue
Have you noticed all the fairisle in the yarn catalogs and plenty of tuck stitch items too!  That's the advantage to being a machine knitter, we can do fairisle and tuck in no time flat with perfect results.

Now, what to knit in this plaid...


Friday, January 11, 2013

More From Brother 270 Issue Helen Is Having

My last couple of posts have been about Helen's 270 issue when isolating a Stitchworld tuck stitch pattern.  Here is her latest email in reply to your help:


Yes, the tuck needles are in D position, the non tuck needles are automatically put in B position when isolating.Already changed the end needle to be in work under the carriage.   Tuck does not work in D position.  Reverse button puts the needles in position for slip stitch.

Thursday, January 10, 2013

Helen's 270 Problem Continues..

Thanks for the messages regarding Helen's issue with her 270 (see my post below).  I sent her your replies and she appreciates the help so much.  Here is her reply about the isolation:

"I am isolating the tuck just like one does to isolate a single motif in fairisle. For example. one cat in the middle of the sweater instead of cats all across the front of the sweater. I want only one tuck motif in the center with stockinette on either side."

If anyone has an idea for her to try out please post.  Thanks so very much!

Machine Knitters are truly a tight knit bunch!

Wednesday, January 9, 2013

A Knitting Machine Friends Projects

Helen, who I met a little over a year ago when she wrote for some advice on her Brother 910 became a quick email friend.  Not only a vey nice lady but a great machine knitter.  Below are some of her recent projects.  She incorporates hand knitting with her machine knitting.

She needs some help too.  Her Brother 270 is acting up and she has tried just about everything to knit Stitchworld pattern # 82.  The needles that are supposed to be knitting are just forming loops not knitting.  She adjusted the Fabric Presser/Sinker Plate and had a bit of luck for a little while then wrote:

"Well, evidently the sinker plate was not the problem.  As long as I knit a tuck stitch across all the needles, the machine tucks properly, but when I try to isolate a tuck stitch, the yarn floats on either side of the isolated tuck stitches.  The isolated tuck stitches knit properly, but the stockinette stitches just float on top."

I am out of suggestions.  Not seeing it in person makes it hard to really diagnose this type of problem.  Has anyone had this happen?  What did you do to fix it?  Please share your thoughts to help out a fellow machine knitter.

Thanks and here are her great looking projects...

Easy & Much Appreciated Gift item!

Nice, Sideways Knit!


I Really Love This Childs Sweater Set


Monday, January 7, 2013

Machine Knitting Italian Style!

Or in Italian it would be: Macchina che lavora a maglia stile italiano!

If you want to watch a skilled machine knitter this is the place to watch.  Her styles are beautiful and techniques are fantastic.  Vanda finishes all garments impeccably.  I must admit, she makes me proud to say I'm Italian!

This is her latest post:

Vanda's Baby Booties!


Watch the video, even if you don't speak Italian.  You can see her confident hands moving along (glad I am not the only one who moves the carriage by holding the fabric presser - on occasion) and you can visually learn a new technique.

Click here for her YouTube demo:

Vanda's YouTube Baby Bootie Technique 

Vanda siete il la cosa migliore! 

Sunday, January 6, 2013

Dog Sweater Pattern - Mikeys!

Here is my pattern for the dog sweater (pictured below - CLICK) I made for Mikey:

Info:
Tuck Stitch
Yarn: Worsted Weight 4 ply
Machine: Bulky (9mm)
Tension: T6 and Rib T4
Gauge: 3.53 sts & 7.27 rows per inch

His Measurements:
Base of tail to base of neck: 19"
Leg length: 11"
Chest circumference: 23" (widest area)
Width between two front legs: 4" (widest area)

BODY
T0, begin with rib on 67 needles zig-zag row.  Set machine to T1 and complete circular rows (3).

RC000, T4, knit 8 rows.  Transfer stitches to main bed, decrease end stitch on carriage side (66 needles).

T6, set machine to hold, bring out 23 needles to hold opposite carriage.  K1 row and wrap yarn of first needle in hold.  Bring 23 needles opposite carriage out to hold and K1 row, wrap.

Push 3 needles opposite carriage back to FWP and K 1 row, wrap.  Continue until all needles are back in work.  Make sure you weight the short rowing as you move along.  On the last two rows you will have less than 3 needles to move back into FWP, treat them in the same way until all needles are in work.

Note:  Depending on your dogs anatomy, you can sharpen the shape when doing short rows by changing the 3 needles (back to FWP) up or down.

Hang weight evenly across knitting.  Set and release tuck stitch pattern and K to RC092 (this is just behind the front leg openings) if you need to adjust the length this is the place to do it.

RC000, cast off 6 sts and K 1 row, cast off 6 sts, K1 row.  K in pattern to RC026.

RC000, E-wrap on 6 sts, hang weight on the e-wraps, K1 row.  repeat the e-wrap of 6 sts and hang weight on them. K to RC026.  Remove on WY.

CHEST/STOMACH PIECE
T4, RC000, circular cast on as before on 14 needles.  K8 rows rib. Transfer needles to MB.

T6, RC000, set to pattern knitting, K85 rows (adjust length here if needed).  Remove on WY.

COLLAR
With wrong side (knit side) facing, rehang neck stitches from body and chest pieces decrease by hanging 2 sts on every 3rd needle.

T4, K1 row.  Transfer stitches for rib.

RC000, K25 rows.  Change to T8, K1 row.  Bind off using the loop through a loop method.

SLEEVES (both the same)
T6, RC000, rehang leg opening sts (center on machine for pattern) with wrong side facing and K1 row.  Remove on garter bar or WY, turn work (tuck sts facing you) and rehang sts.  Change to tuck pattern and K23 rows (this made mid leg length for the sweater I did) you can adjust length as you like.

T4, RC000, transfer sts for rib, K11 rows (again your choice length of ribbing).  Bind off same manner you did for collar.

Join seams, hide ends.  Here is the finished shape - CLICK

This I adapted/changed from an old photo copy of someone's notes that I found tucked in a book I purchased.  It was originally designed for the standard machine and with GC. Wish I could give credit for it's original roots.  

Thursday, January 3, 2013

Mikey In His Sweater!

Mikey was in the mood for a nice walk today.  So on went his sweater and out came the camera.  Las Vegas which is known for it's scorching hot temperatures does get cold in winter, today's high was 52° F or 11° C.

Let's Go, I'm Waiting!
His long "Silky Terrier" hair hid the crew neck collar in this picture but as you can see it's a perfect fit, he loved it!

I'll post my pattern (for the 9mm machine) this weekend.

Wednesday, January 2, 2013

Tuck Stitch Crew Neck Sweater...For Mikey

Last year when my dog Mikey was still a 6 month old puppy I made him a few sweaters on my standard electronic, he loved them!

Now that he is 1-1/2 years old he has outgrown them and time for new ones.

The other evening I wanted to make something fast for him, so I went to my bulky machine and created the below tuck stitch sweater for him; it's just over 4 ounces of worsted weight yarn.

Mikey is about 30 pounds, a Terrier & Sheltie mix and my best friend.  Notice it is anatomically correct too!  Some of the dog sweaters I have seen use straps, elastic or the back is some sort of flap that just sits on top of the dogs back.  Not liking those, I made this in true pullover fashion.

I have all my notes, gauge and etc. that I will type up later in the week and send to those who may like to make one too.

Folded In Half -  How It Will Look On Mikey

Underside Back
 Now, to get Mikey to pose for a picture...


Tuesday, January 1, 2013